
Accessing the internet via restricted networks can be a pain. But so can be securing a network and putting those restrictions in place. Let’s have a look at how DNS tunneling can in some cases allow getting data in and out, when regular access is blocked or otherwise restricted, but DNS queries work.
Seeing this technique in action can help you understand how unauthorized users could get around your security measures and use less monitored channels for communication (e.g. for malware command and control), or may come in handy when doing an attack simulation yourself. In addition, it’s a fun way to mess with captive portals which often kind of “man-in-the-middle” your connection to direct you to a sign-up page, but still let you resolve names in any state.
I always wanted to set up something like this since I first read about the technique. Today, I finally did and want to document the process.
How does it work?
In a nutshell: what we want to do is tunnel IPv4 network packets over DNS, using the hostname to send data (via a DNS query) and a record type, e.g. NULL*, TXT or other record for transporting the response, meaning we will have DNS queries in a format like <encoded data>.x.domain.com for our upstream and the DNS response for our downstream.
For the whole thing to work, we need control over a domain and be able to edit the zone file. In addition to that, we need a server that we can point our address record (A) to and that will do the communication for/with us.
Due to the size limitations of DNS records, we shouldn’t expect to get blazingly fast data transfer rates, but any connection is better than none. Note that due to these limitations, the domain and subdomain should be as short as possible to leave as much as possible room for the actual data.
Iodine
Most of the work in this setup will be done by a tool called Iodine by kyro.se.
It has a server and client component and it is recommended to run the same version on both ends. I will use the latest master, which currently points to commit 27e5d6f.
Iodine will take care of sending (client) and answering (server) the DNS queries, plus handle fragmentation, compression, encoding, record type to use, etc., and perform a lot of other magic behind the scenes. We essentially only need to take care of starting both the server and the client tool.
For more detailled information or troubleshooting have a look at the README and the code hosted at GitHub.
Prerequisites
To summarize the prerequisites again, we need:
- Control over a domain
- A server (preferrably with a static IP)
- A client (for example your computer)
I used an Ubuntu 18 server and Kali Linux 2019.1 as client. As mentioned above, the version of Iodine we are going to compile is from commit 27e5d6f.
The setup
Building Iodine
Let’s clone Iodine, make and install it:
git clone https://github.com/yarrick/iodine.git
make
make install
Which gives us the executables /usr/local/sbin/iodined or /usr/local/sbin/iodine, respectively. iodined will be our server component, iodine our client component.
Run iodined -v and iodine -v to check your versions.
DNS zone setup
We will have to create two records in our zone. A NS record and an A record pointing to our server.
Name                | Type    | Value
----------------------------------------------------
x.<domain>.<tld>.   | NS      | xns.<domain>.<tld>.
xns.<domain>.<tld>. | A       | <server ip>
<domain> is the domain we control, <server ip> is the IP of the server where we will run iodined.
You can name your subdomain as you like, but remember to keep it as short as possible.
Server setup
At this point we should have a fresh server install and on it the Iodine version we’ve built above. Also, inbound ports for SSH (TCP 22) and DNS (UDP 53) should be open.
Let’s ssh into the server and start iodined.
ssh -i key.pem user@host
sudo iodined -f <tunnel ip> x.<domain>.<tld>

Enter password: xxxx
Opened dns0
Setting IP of dns0 to 10.10.10.1
Setting MTU of dns0 to 1130
Opened IPv4 UDP socket
Opened IPv6 UDP socket
Listening to dns for domain x.<domain>.<tld>
-f will keep it running in the foreground. For the tunnel IP, specify an internal IP you want to use. I chose 10.10.10.1.
After starting iodined, you should be asked to set a password. Enter it and remember it for later when starting the client.
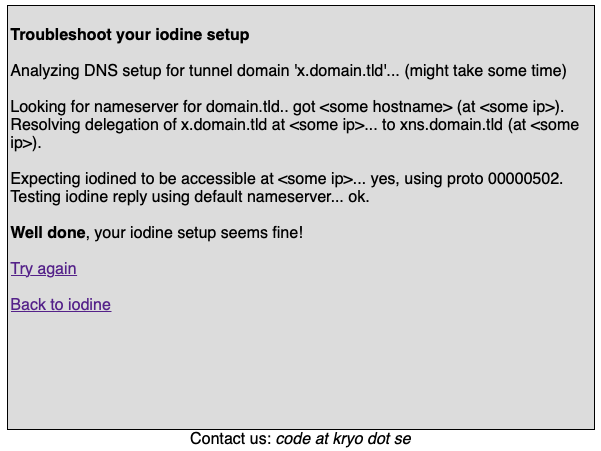
If you like, you can now test your server setup via the troubleshooting tool provided by kyro.se.
Client setup
Let’s head over to our client machine and startup iodine.
iodine -f -P <password> x.<domain>.<tld>
For now, let’s keep all the options at their default setting, and only specify the password with -P. However, if you’re testing in an environment where “anything goes”, you may want to specify -r to make sure to use DNS tunneling over raw UDP tunneling (otherwise Iodine will try to detect if this is possible and switch over).
Opened dns0
Opened IPv4 UDP socket
Sending DNS queries for x.<domain>.<tld> to <local nameserver>
Autodetecting DNS query type (use -T to override).
Using DNS type NULL queries
Version ok, both using protocol v 0x00000502. You are user #0
Setting IP of dns0 to 10.10.10.2
Setting MTU of dns0 to 1130
Server tunnel IP is 10.10.10.1
Skipping raw mode
Using EDNS0 extension
Switching upstream to codec Base128
Server switched upstream to codec Base128
No alternative downstream codec available, using default (Raw)
Switching to lazy mode for low-latency
Server switched to lazy mode
Autoprobing max downstream fragment size... (skip with -m fragsize)
768 ok.. 1152 ok.. ...1344 not ok.. ...1248 not ok.. ...1200 not ok.. 1176 ok.. 1188 ok.. will use 1188-2=1186
Setting downstream fragment size to max 1186...
Connection setup complete, transmitting data.
A simple first thing to check is, if we can ping the tunnel IP (in this case 10.10.10.1). There should also be a new interface dns0 (ifconfig) with an assigned IP from the tunnel subnet (here: 10.10.10.2). Sniffing on the default interface (for example eth0) we can now see the (potentially, lots of) DNS queries, more specifically, NULL queries in our case.
iodine: BADIP: Server rejected sender IP address..., you can try to pass -c to the server command to check if “disabling the check of client IP/port on each request” (see README#server-side) will solve these issues.Using a SOCKS proxy to secure our traffic
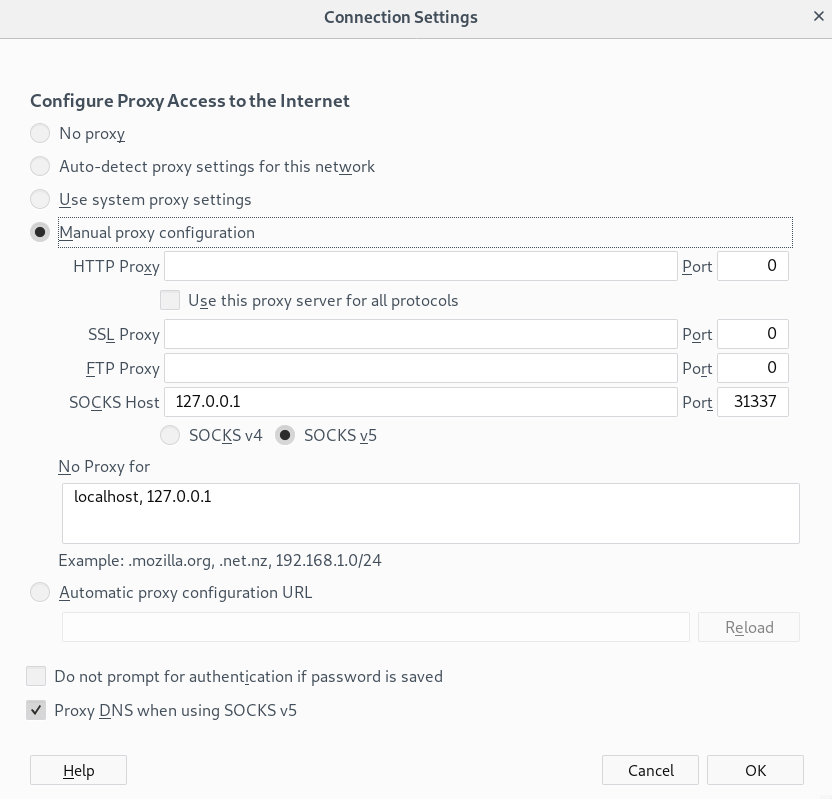
The traffic that we are sending over DNS is not encrypted. What we can do to change that, is to open a SSH connection via the DNS tunnel and use it as a SOCKS proxy (so, a tunnel within the tunnel).
ssh -ND 31337 -i key.pem user@10.10.10.1
I didn’t use placeholders here to better show which IP to use. The 10.10.10.1 is the tunnel IP which we have specified when starting iodined on the server, 31337 is the port to be used for the local socket. Choose any port you like >= 1024.
-N specifies that we do not want to execute a remote command (we just need the port forwarding). -D lets us do the port forwarding so that SSH can act as our SOCKS server.
Let’s do a quick test by curling a service that echoes back our IP:
curl -x socks5h://127.0.0.1:31337 http://httpbin.org/ip
It should give back the address of the server, not of our client (do a quick check with and without the tunnel).
If the curl request times out, you may have a problem with the name resolution. For debugging purposes, try to curl an IP instead of a hostname or see if it works when using socks5:// (without the h; this will do the name resolution on your client, rather than on the server). If it does, check if something is wrong with your /etc/resolv.conf on the server (you could try to set another nameserver, e.g. via the resolveconf package).
Using a browser (or any other app)
Any application that allows us to specify a SOCKSv5 proxy, can now be configured to use this tunnel. Here’s an example for Firefox:
Tunnel everything
For cases where a SOCKS proxy is not feasable or where we want to tunnel everything from our machine, using a VPN should be considered.
If you’re looking for information on how to set up the natting on the server and routes on the client to send everything (unencrypted) over the dns0 interface, check out this gist (archived) by calzoneman.
It boils down to:
echo 1 > /proc/sys/net/ipv4/ip_forward
iptables -t nat -A POSTROUTING -o eth0 -j MASQUERADE
iptables -A FORWARD -i eth0 -o dns0 -m state --state RELATED,ESTABLISHED -j ACCEPT
iptables -A FORWARD -i dns0 -o eth0 -j ACCEPT

route add <server ip> gw <default gateway on client network>
ip route del default via <default gateway on client network>
ip route add default via <tunnel ip>
Again, easy to check if it’s working by doing curl http://httpbin.org/ip (this time without the proxy) or sniffing on the dns0 interface.
Detection and Prevention
How can you detect and/or prevent this kind of tunneling? I haven’t actively looked into this, but a few things may work for detection or prevention:
- Detection based on amount, size, host-naming and type of DNS queries from regular clients. The traffic will surely statistically stand out.
- In general, the amount of traffic over port 53 from individual clients should stand out (if used for regular browsing and not just sending/receiving a few commands)
- Disallowing internal DNS servers to resolve to external addresses and do the external resolution only through a proxy should prevent this technique
- In the case of captive portals, resolving external addresses only after sign-up may work. But then again, there are also other ways for getting around the captive portal, e.g. capturing and then assuming an already signed-up MAC address (which requires much less preparation)
- Blocking certain domains/IP blocks/regions is surely always possible, but ineffective if the other end could potentially be anywhere.
✉️ Have a comment? Please send me an email.